[QBD] FIlling out the "Select your plan" intake form
Here’s how to fill out the signup form for the DIY QuickBooks
integration. The form’s purpose is to collect some basic information,
then let you create a username and password to access the integration
dashboard, where you’ll be able to configure mapping from QuickBooks to
Zoho by yourself.
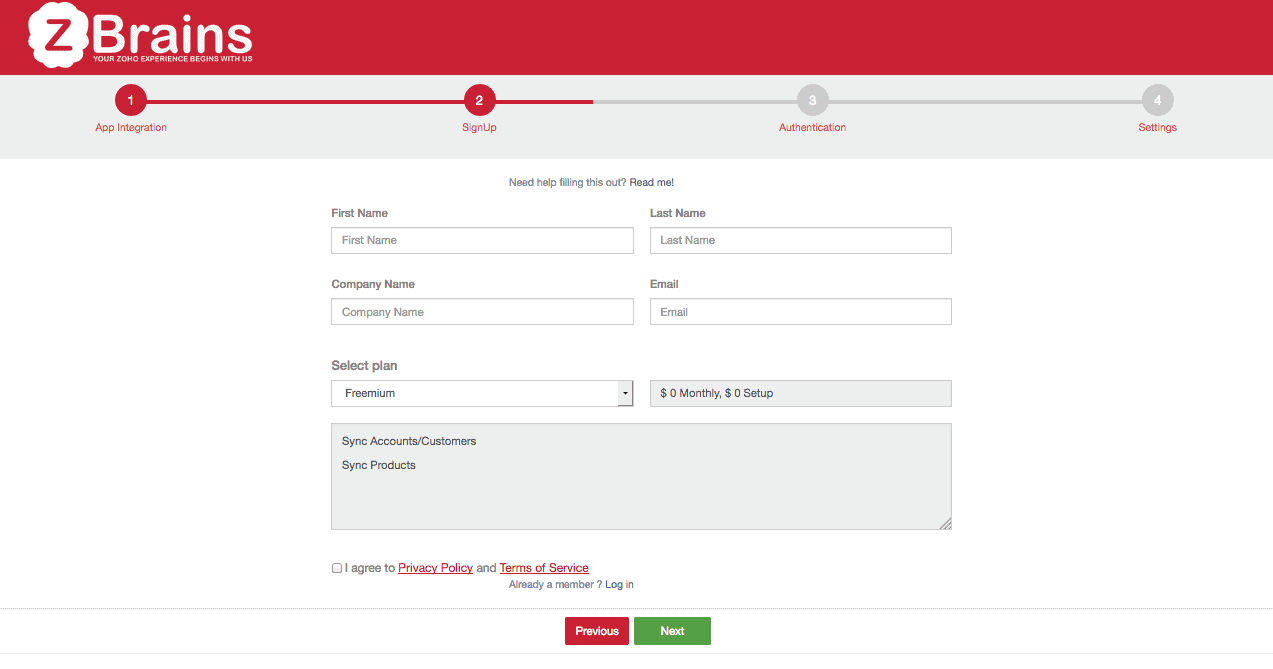
First Name, Last Name, Company Name: Hopefully these are self-explanatory! If not, give us a call and we’ll try to help.
Email: This can be any email, not necessarily your
Zoho email. We’ll use it to send you announcements, links to the
integration dashboard and to other integration-related content as
necessary (but not too often – don’t worry).
Select Plan: Use the drop-down menu to select the
syncing plan you’d like to use. All premium plans require entering a
credit card number, but you won’t be charged until after your 15-day
free trial.
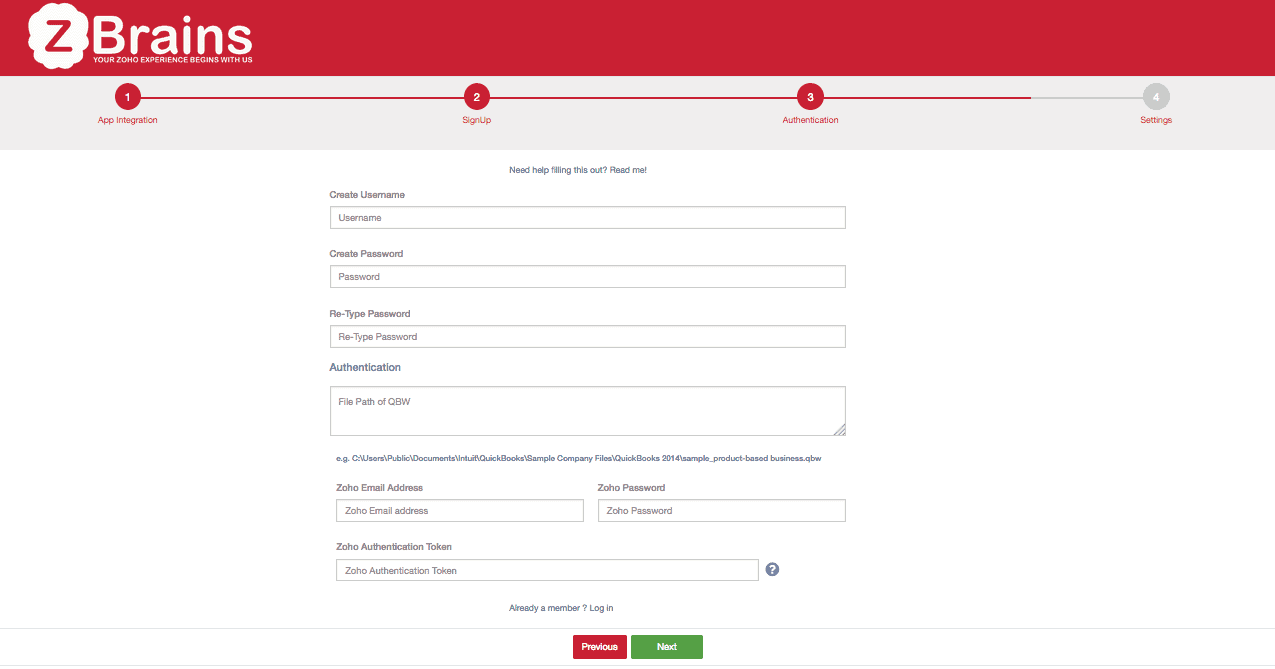
Create Username: This is what you’ll use to log into the integration dashboard. Make it something you won’t forget!
Create Password: You’ll use this not only to log
into the integration dashboard, but also to authenticate the QWC file
that the QuickBooks Web Connector will use to run the integration.
Again, make sure this is one you won’t easily forget!
Authentication – file path of QBW: This is the QuickBooks company file path we’ll use to connect to your QuickBooks.
- To locate this, run a search for a file with the extension .qbw.
- Please
make sure you do this from the computer your QuickBooks company file is
located on, or through a remote desktop session with that computer! Mapped drives will not work for this procedure.
- When you’ve found your company file (hint: it will probably include
your company’s name), right-click it (or, on a Mac, enable two-button
clicking before right-clicZking) and select Properties.
- Select the Details tab, highlight the text after the File Path heading, and copy+paste that into the field.
Zoho Email Address, Zoho Password: Please make sure these are the admin’s credentials.
Zoho Authentication Token: You can generate one of
these by logging into your Zoho CRM, clicking the “tools” icon (the one
with the two wrenches), and clicking Setup.
- At the bottom of the middle column of options, click APIs.
- At the right side of the screen, at the same level as the CRM APIs heading, click the gear with the arrow beside it.
- From the drop-down menu, click Authentication Token Generation.
- On the Browser Mode section, type something into the field you’ll be
able to use to identify the authentication token later if need be.
(Something like “QuickBooks” will do.) Click Generate.
- On the page that follows, highlight the text that appears after
“AUTHTOKEN=” and copy+paste this into the field on the integration setup
page.
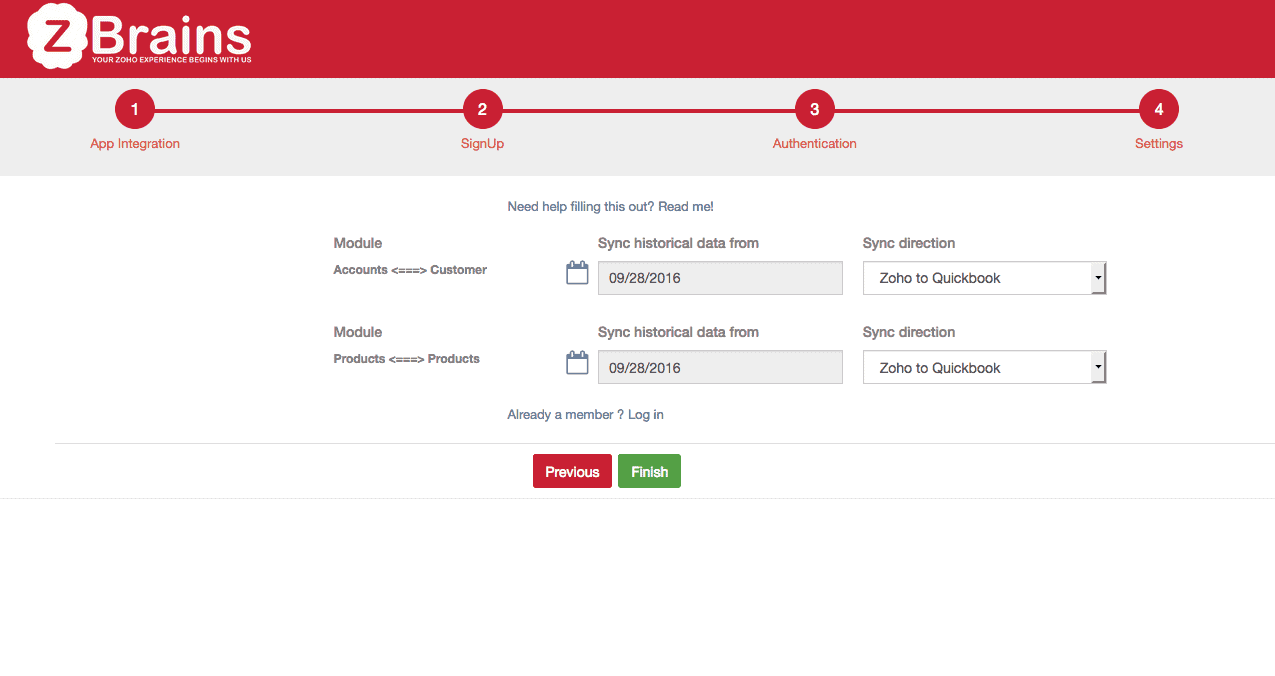
Sync historical data (for either annual premium customers or monthly or freemium customers who purchased the add-on): The Module options refer to the modules within Zoho you’d like to sync with QuickBooks.
- Select the dates you’d like the integration to reach back to, then select the direction you’d like the data to flow.
- Then, click Finish and you’ll be directed to the sign-in page.
- Use the credentials you created at the first step to log into the integration dashboard and begin field mapping.
Related Articles
I. Zoho QuickBooks Integration | Field Mapping
ZBrains Dashboard >> Mapping This is the default or home page you’ll see upon logging into the Zoho QuickBooks integration dashboard. This screen allows for the mapping of different QuickBooks fields (on the left-hand side, marked by QB icons) with ...VI. Zoho QuickBooks [Desktop] Integration | Getting Data to Sync
Are you trying to find the QuickBooks Online syncing tutorial? Click here instead. I. Downloading and uploading the QWC file. Before syncing for the first time, you'll need to move a QWC file from the ZBrains dashboard to your QuickBooks Web ...V. Zoho QuickBooks Integration | Account & Administration Options
ZBrains Dashboard >> Clicking your Username Clicking your username in the upper right corner of the screen reveals several other options: Change Plan: This displays your current integration plan juxtaposed with other available Zoho QuickBooks ...IV. Zoho QuickBooks Integration | Settings Explained
ZBrains Dashboard >> Settings The settings menu is comprised of a few tabs. Their uses and purposes are enumerated here: QB File Path [Desktop customers only]: This field contains the file path to the QuickBooks company file that you used when you ...II. Zoho QuickBooks Integration | Sync Logs
ZBrains Dashboard >> Logs You’ll be able to track which records the Zoho QuickBooks integration has interacted with by examining the Logs page. Different log screens are available for each available module, although the screen will default to ...